Before Using a Template - Invoice Manager for Excel
Logo image and company information
Click the "Replace Logo Image" button on the "Invoice" ribbon tab to replace the default logo image.
Push down the "Design mode" button on the "Invoice" ribbon tab to update the company information.
Taxes
Setting the number of taxes, for example, changing from two to one, is implemented by hiding the tax rows on the worksheet. If you choose "One Tax", the first tax row identified by the "oknTax1" name is visible; if you choose "Two Taxes", both the rows identified by the "oknTax1" and "oknTax2" names are visible.
This works well with the default invoice template shipped with Invoice Manager for Excel, where the "oknTax1" and "oknTax2" names are put on two separate rows and no other critical content is located there.
However, if a template is deeply customized, for example, the "oknTax1" and "oknTax2" names are moved to one row or other fields are put on the rows where the "oknTax1" and "oknTax2" names reside, the feature of setting the number of taxes may not work properly. In this case, you need to customize the taxing cells manually by making the rows hidden or visible or by moving the cells inside or outside the printable area.
To set up the taxing rules using the "Settings" window, follow the steps below.
- Click the Settings button on the Invoice worksheet to open the Settings window.
- Click Taxes.
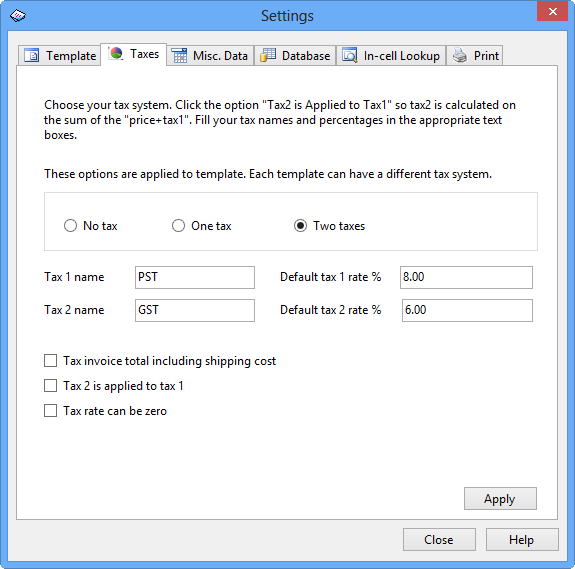
- Choose your tax system: No Tax, One Tax, or Two Taxes. If you have two taxes, click the option Tax2 is applied to tax1, so tax2 is calculated on the sum of the price plus tax1. Fill in your tax names and percentages in the appropriate text boxes.
- Click Apply.
- Close the Settings window and return to Excel.
- Click the Save button on the Excel toolbar to save the modified workbook.
Additionally, each product has a Taxable attribute that controls whether the tax rate will be applied to the product. For each invoice, you can also set its tax rates and Taxable attributes.
Creating a new database (optional)
On a fresh installation, the default invoice template is connected with the sample.mdb database. This database is installed for demonstration purposes. You can use this database to try out how Invoice Manager for Excel works. After reviewing and testing the software, you will want to create a new database for your own data. To create a new database, follow the steps below:
- On the Invoice worksheet, click the Settings button to open the Settings window.
- Click the Database tab.
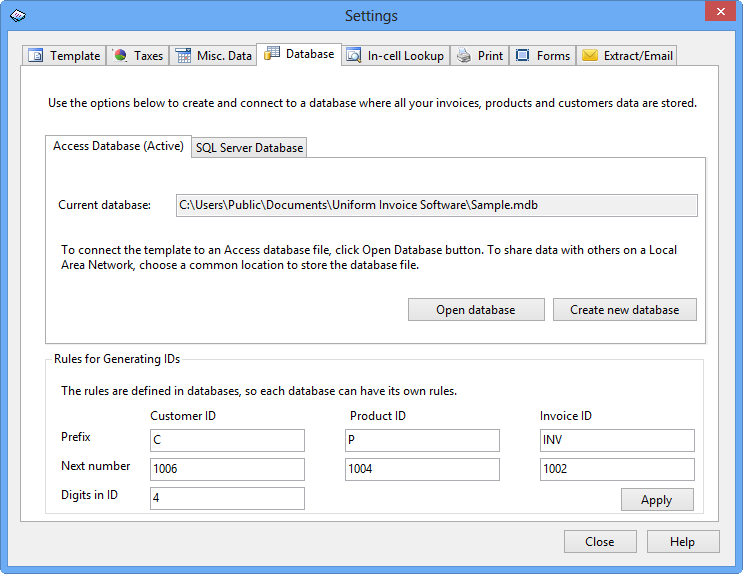
- Click Create new database under the Access Database tab.
- Select a folder to store your new database file and enter the database file name. Click Save to create a new database file.
- If you want to open the newly created database for the current workbook, click the Open Database button under the Access Database tab. Then select the database file you just created.
- If the database is successfully opened, the database name will be displayed below the Current Database label on the Invoice worksheet.
- The full path and file name of the database are stored in a hidden cell in the workbook. To make the workbook connect to or open the new database automatically the next time you open it, click the Save button on the Excel toolbar to save the workbook.